Setting up hosting
Setting up and customizing hosting
Free and Deluxe users
If you are have a free account or are a Solo Deluxe user, you have access to our free hosting services that enable storing, customization and sharing your image and video content. You can configure several options for how your content is hosted.
1. First, log into your ScreenPal account 2. From the menu on the left click Settings.
3. On the left navigation menu bar click Permissions.
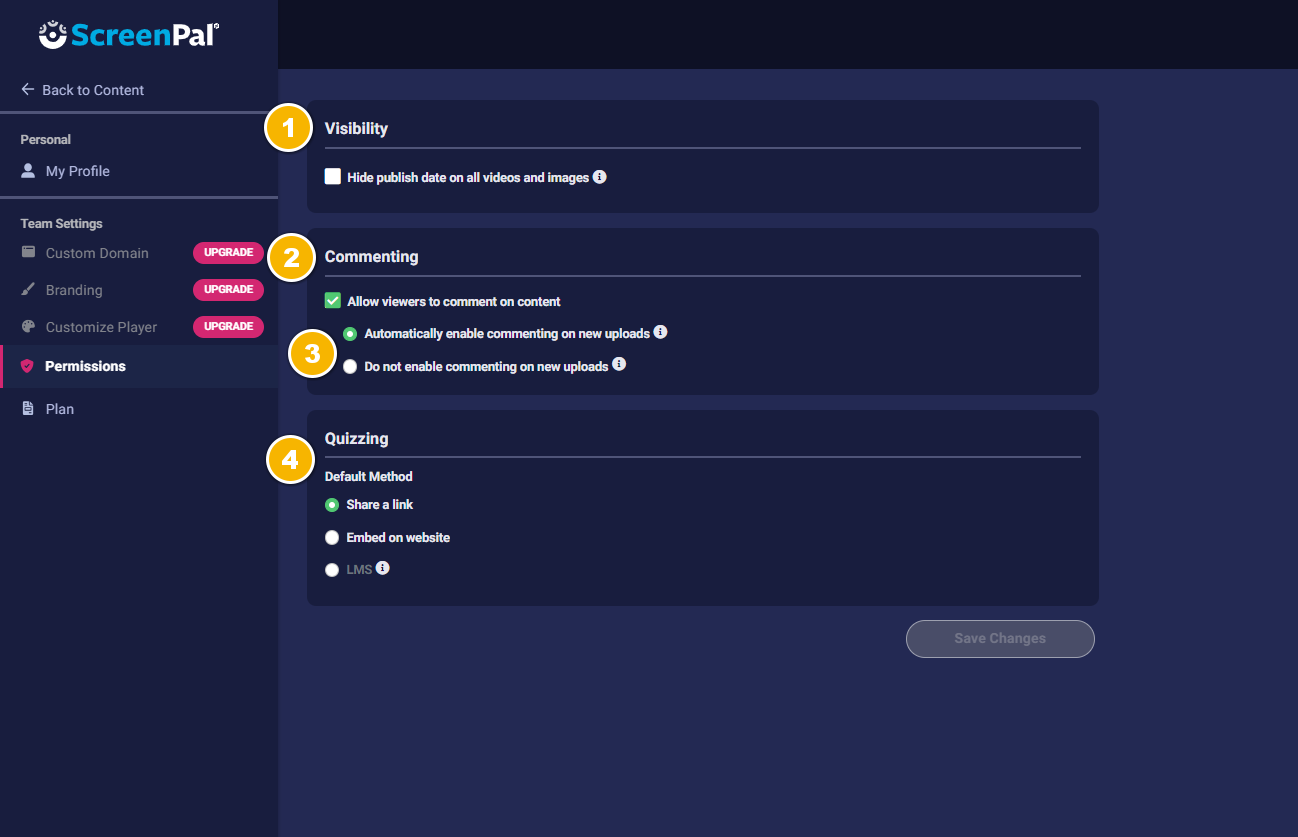
You have several settings on this page:
1 - You can choose to hide the publish date on all your images and videos.
2 - You can enable or disable the commenting section displayed for your viewers on your videos. If disabled, you cannot enable this feature for any video in your library.
3 - If commenting is enabled, you can set all new video uploads to have commenting on by default. To turn off commenting for specific videos, go to the Video Settings tab.
4 - Choose the default quiz-sharing method. When you create a new quiz and go to the Assignment and Settings tab, this method is automatically selected, but can be changed.
If you are have a free account or are a Solo Deluxe user, you have access to our free hosting services that enable storing, customization and sharing your image and video content. You can configure several options for how your content is hosted.
1. First, log into your ScreenPal account
2. From the menu on the left click Settings.
3. On the left navigation menu bar click Permissions.
You have several settings on this page:
1 - You can choose to hide the publish date on all your images and videos.
2 - You can enable or disable the commenting section displayed for your viewers on your videos. If disabled, you cannot enable this feature for any video in your library.
3 - If commenting is enabled, you can set all new video uploads to have commenting on by default. To turn off commenting for specific videos, go to the Video Settings tab.
4 - Choose the default quiz-sharing method. When you create a new quiz and go to the Assignment and Settings tab, this method is automatically selected, but can be changed.
Solo Max and Team Plans
If you have a Solo Max or a Team Plan (with the exception of legacy Team Deluxe plans), you have many more options available in hosting that enable you to personalize your viewers' experience. You can choose to use a custom domain, customize your videos with your organization's colors and branding, and more.
 Note: To change these settings for a Team Plan, you must be an Team Owner or Administrator.
1. Login to your account as a Team Owner or Team Administrator.2. From the menu on the left, click Settings.
3. Under Team Settings, click Custom Domain.
4. Select one of the following options:
- No Custom Website - Links to your ScreenPal content, including images and videos, will point to screenpal.com.
- Subdomain on Screencast.Host.com - Links to your content will point to a custom subdomain on ScreenPal, such as myvideos.ScreencastHost.com.
- CNAME from your domain - Maps your subdomain to your selected ScreenPal homepage, which is defined in the Home Page field in the Branding section.

5. Next, click Branding in the menu.
Here, you can customize the branding for your video watch pages.
- Enter a Page Title that will be displayed at the top of the watch page for your team's videos.
- Select the checkbox for Use Logo to upload an image to use on your team's watch page header. If you select Use Logo, the Page Title will not be displayed.
- Add a link to the logo you uploaded. When viewers click your logo, this URL will open in a new browser tab. Please note that this value must be a valid URL or you will not be able to save your changes. if you do not to enter a link in the Logo Link box, your logo will still be displayed at the top of your site, but will not be clickable.
- Customize the color of the header by selecting the Customize header color check box and selecting a color using the color picker, or entering a hex color code in the box.
- Change what is displayed on your site's Home Page if you are using a subdomain or CNAME.

6. Click Customize Player.
Use this area to customize the video player for your team. You can select a logo that will be displayed on all videos uploaded by members of your team, and choose the default player color for your team.

7. Click Permissions.
From the Permissions area, you can configure several options.
If you have a Solo Max or a Team Plan (with the exception of legacy Team Deluxe plans), you have many more options available in hosting that enable you to personalize your viewers' experience. You can choose to use a custom domain, customize your videos with your organization's colors and branding, and more.
Note: To change these settings for a Team Plan, you must be an Team Owner or Administrator.
1. Login to your account as a Team Owner or Team Administrator.
2. From the menu on the left, click Settings.
3. Under Team Settings, click Custom Domain.
4. Select one of the following options:
- No Custom Website - Links to your ScreenPal content, including images and videos, will point to screenpal.com.
- Subdomain on Screencast.Host.com - Links to your content will point to a custom subdomain on ScreenPal, such as myvideos.ScreencastHost.com.
- CNAME from your domain - Maps your subdomain to your selected ScreenPal homepage, which is defined in the Home Page field in the Branding section.
5. Next, click Branding in the menu.
Here, you can customize the branding for your video watch pages.
- Enter a Page Title that will be displayed at the top of the watch page for your team's videos.
- Select the checkbox for Use Logo to upload an image to use on your team's watch page header. If you select Use Logo, the Page Title will not be displayed.
- Add a link to the logo you uploaded. When viewers click your logo, this URL will open in a new browser tab. Please note that this value must be a valid URL or you will not be able to save your changes. if you do not to enter a link in the Logo Link box, your logo will still be displayed at the top of your site, but will not be clickable.
- Customize the color of the header by selecting the Customize header color check box and selecting a color using the color picker, or entering a hex color code in the box.
- Change what is displayed on your site's Home Page if you are using a subdomain or CNAME.
6. Click Customize Player.
Use this area to customize the video player for your team. You can select a logo that will be displayed on all videos uploaded by members of your team, and choose the default player color for your team.
7. Click Permissions.
From the Permissions area, you can configure several options.
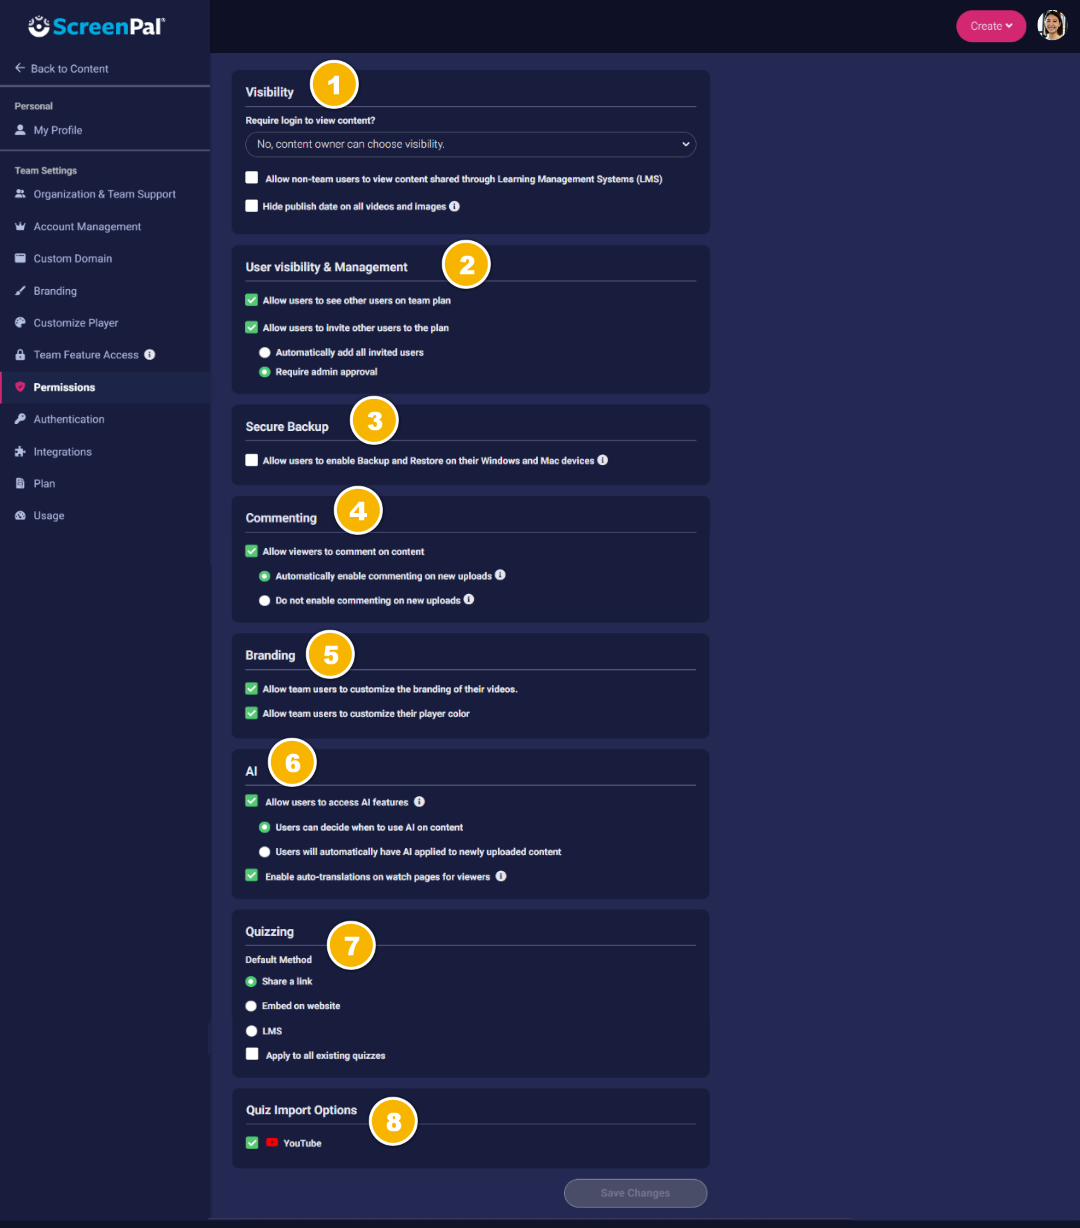
1. Visibility
For Require login to view content, you have two options:
- Select No, content owner can choose visibility to allow all members of your team to select the visibility setting for each video they upload.
- Select Yes, require content only visible to Team Users, to automatically set all images and videos uploaded by members of your team to Team User visibility. This visibility setting requires team users to log into their ScreenPal team account before viewing content uploaded by other team members. When you select Yes, members of your team cannot override the visibility setting for a video unless you add them to a specific user group with override ability. You may want to do this, for example, if you have a group within your team that consistently posts public videos, such as Marketing or Customer Education.
Choose whether you want to display or hide the publish date for your team's videos and images by selecting or clearing the check box for Hide publish date on all videos and images.
Note: As a Team Owner or Team Administrator, you can still override the visibility setting for content that these team members upload or channels they create. For example, if a team member who is part of a group with override ability changes the visibility of a video to Public and that video should not actually be public, as a Team Admin you can open the video details and select the Clear visibility override check box. Selecting this check box changes the visibility of the video back to Team User. For more information, see our Team Plan Sharing video tutorial.
To allow specific groups of users to override the Team User visibility setting, save your selection for Require login to view content. Scroll back up to the top of the Permissions page, and click the groups link:

This opens the Groups area of your account:
Click the More Options icon for the group to which you want to give override access and select Edit Group from the menu.
This opens the Edit Group box. To enable members of the selected group to override the video visibility setting of content they upload to ScreenPal, select the check box for Allow group members to choose visibility for their content (regardless of team visibility settings) and then click Save.
2. User Visibility and Management
User Visibility & Management enables you to determine if team members can see other users within the team and invite new users to join your team:
To allow team members to see other users within the team, select the check box for Allow users to see other users on team plan.
To enable members of your team to invite other users to your Team Plan, select Allow users to invite other users to the plan. When you select this option you can also decide whether to automatically add users that your team members invite, or require the approval of a Team Admin before adding them.
3. Secure Backup
Secure Backup gives you the option to enable the Backup and Restore feature, which will be presented to Team Creators when using the Project Manager on both Windows and Mac.
4. Commenting
For Commenting you can:
- Enable or disable the commenting section displayed for viewers on your videos. If you clear the check box for Allow viewers to comment on content, users on your team cannot enable commenting for any videos in your account.
- If you have commenting enabled, you can set new video uploads to have commenting enabled automatically. Visit Video Settings to turn off commenting for specific videos. Alternatively, select Do not enable commenting on new uploads if you do not want to turn on commenting by default.
5. Branding
Use this area to determine whether you want to allow the members of your team to customize the branding of their own videos (overriding the selections you made in the Branding area of Settings) and allow team members to customize the player color of their own videos (overriding the selections you made in the Customize Player area).
6. AI
If you are a Solo Max user, you can enable the ScreenPal AI features by selecting the check box for Enable AI features.
If you are a Team Plan owner or administrator, you can enable the AI feature for all members of your team by selecting Allow users to access AI features.
Next, select one of these options:
- To run the AI feature manually on the videos you upload to ScreenPal, select the button next to You/Users decide when to use AI on content. To run the AI tool on a video, you will need to visit the Video Settings tab and click the Generate button.
- To automatically run AI on every video you upload to your ScreenPal hosting account, select AI will automatically be applied to newly uploaded content / Users will automatically have AIU applied to newly uploaded content.
Finally, you can enable automatic language translations on your video watch pages for your audience by selecting the checkbox next to Enable auto-translations on watch pages for viewers. When auto-translations is enabled and you run our AI tool on a video, members of your audience can visit the video watch page, select their preferred language from a list, and translate the video's captions.
7. Quizzing
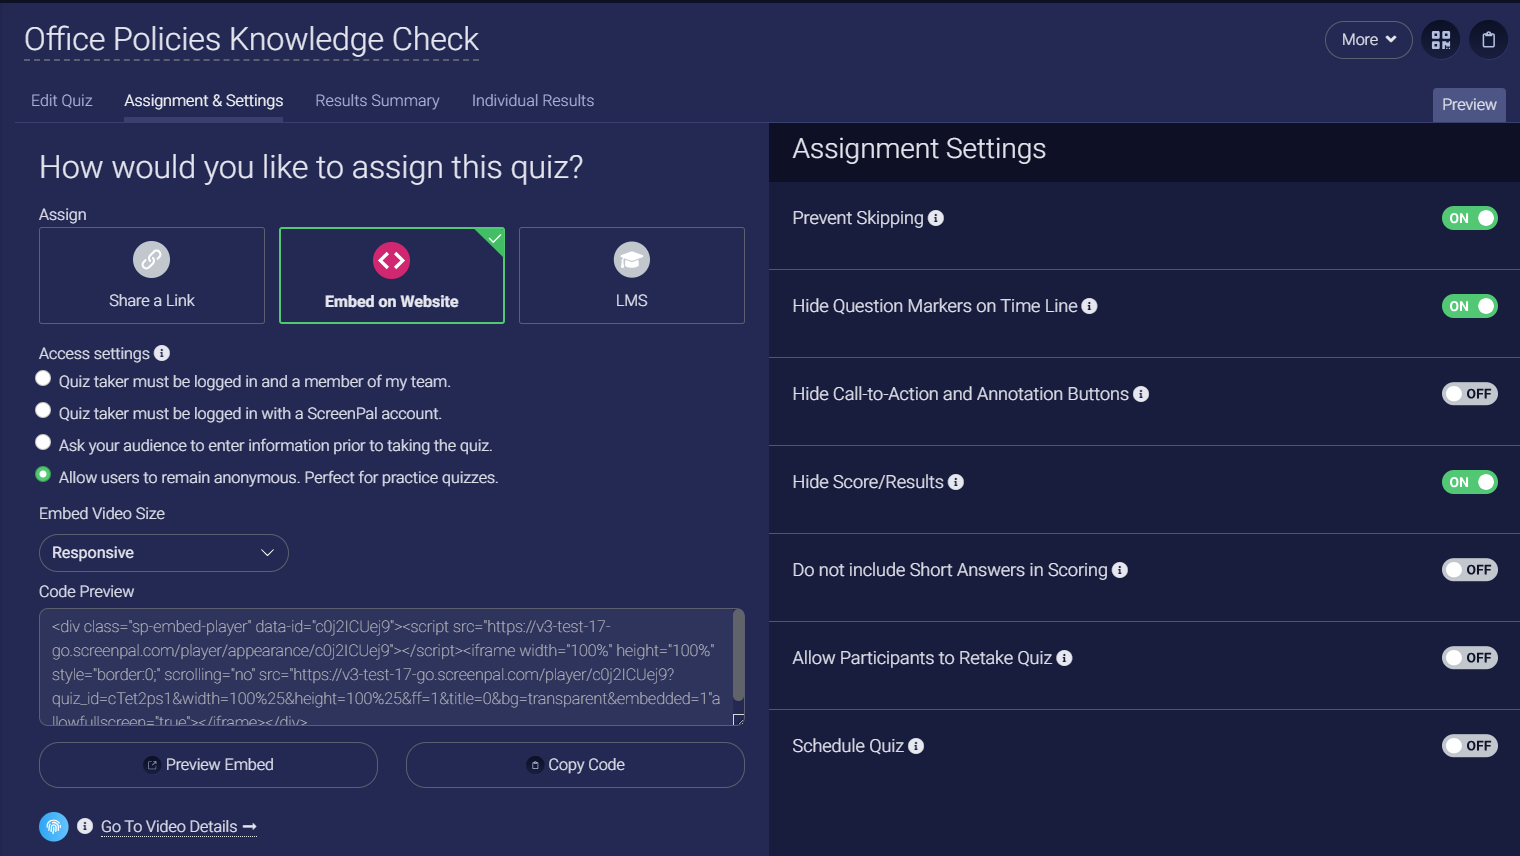
Here, you can select the Default Method for sharing a quiz. The method you select will automatically be selected on the Assignment & Settings tab of your quiz, but can be changed if necessary.
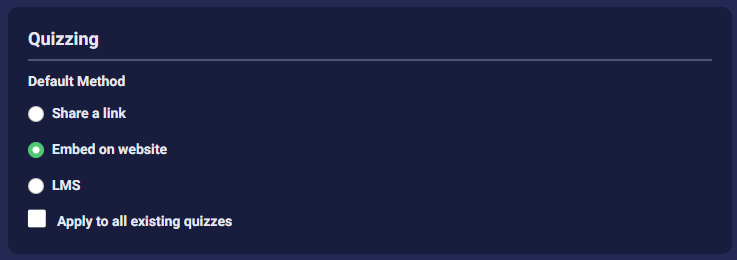
You can also retroactively apply the sharing method to all previously created quizzes in your ScreenPal account by selecting the check box for Apply to all existing quizzes.
Here, you can select the Default Method for sharing a quiz. The method you select will automatically be selected on the Assignment & Settings tab of your quiz, but can be changed if necessary.
You can also retroactively apply the sharing method to all previously created quizzes in your ScreenPal account by selecting the check box for Apply to all existing quizzes.
8. Quiz Import Options
Quiz Import Options enables you to decide if you want to allow your team members to import videos from YouTube to add quiz questions to. If you clear the checkbox next to YouTube, users on your team will not be able to select the From YouTube option when they click Add Media on the Create a Quiz dialog.
When you are finished setting up your team's permissions, be sure to scroll to the bottom of the page and click Save Changes.
If you have any questions or need further assistance, please contact our support team directly, using the link below. Click Submit a Ticket and provide us with a brief description of your concern. We will contact you within 24 hours.
Related Articles
What happens if my Team Plan lapses?
What happens when you are a member of a K-12 Team Plan that lapses? When you are a member of a Team Plan whose Team Administrator has identified it as a K-12 plan, your content will be frozen when your plan lapses. You will see this message when you ...Creating Groups for your team
If you are a Team Owner or Team Administrator of a Team Plan, you can create collections of users called Groups. Your Team Members can then share content to these groups without having to select individual Team Members. You can also enable a group to ...Team Plan role types
When you add team members to your Team Plan, there are several roles they can have. Roles determine what users can see and do within the ScreenPal desktop apps, as well as ScreenPal hosting. The following roles are available when you are using a ...How are Creator Licenses counted in Team Plans?
When you have a Team Plan, a Team Creator license is consumed when a Team Member logs into the ScreenPal Team Plan account during the plan month and interacts with ScreenPal content or launches the tools. Examples of actions that consume a Creator ...Team Admin: Add users to your Team Plan
Team Creators versus Team Users When you have a Team Plan, ScreenPal Team Creator licenses are consumed when Team Member logs into the ScreenPal Team Plan account during the plan month and interacts with ScreenPal content or launches the tools. Some ...