Set up ScreenPal with Blackboard using LTI v1.3
How to set up ScreenPal with Blackboard using LTI v1.3
The ScreenPal LTI screen recorder integrates with many learning management systems. This article will help with the setup of the ScreenPal LTI version 1.3 app within the Blackboard LMS for administrators and teachers. For information about how to set up version 1.1 of the LTI plugin, please see Set up ScreenPal with Blackboard using LTI v1.1.
You can use the LTI app to enable Blackboard to access the Recorder and Video Editor, as well as other tools provided by your team plan (embedding a video channel, adding a screen recorder button for student assignments, etc.)
If you are a member of a Team Plan, in order for your team members to access the features of a Team Plan, the Team Admin for your ScreenPal account will need to configure the LTI App.

Important: If your team is currently using the ScreenPal LTI v1.1 tool, please see Upgrade to ScreenPal LTI version 1.3 for Blackboard and follow those instructions instead of those outlined in this article.
Please note that while ScreenPal will continue to support the use of LTI v1.1 with ScreenPal, we will no longer be developing ScreenPal feature updates for this version.
Use of the LTI app is only supported for Team Business and Team Education plans.
Team Admins: Register LTI version 1.3 in Blackboard
To complete these steps, you must first log into Blackboard as an Administrator.
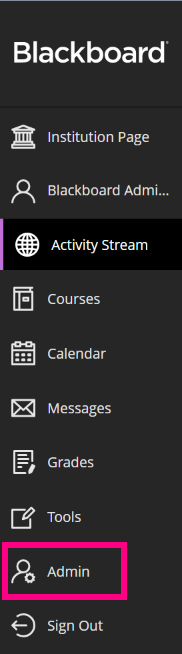
1. First, click Admin in the menu on the left.
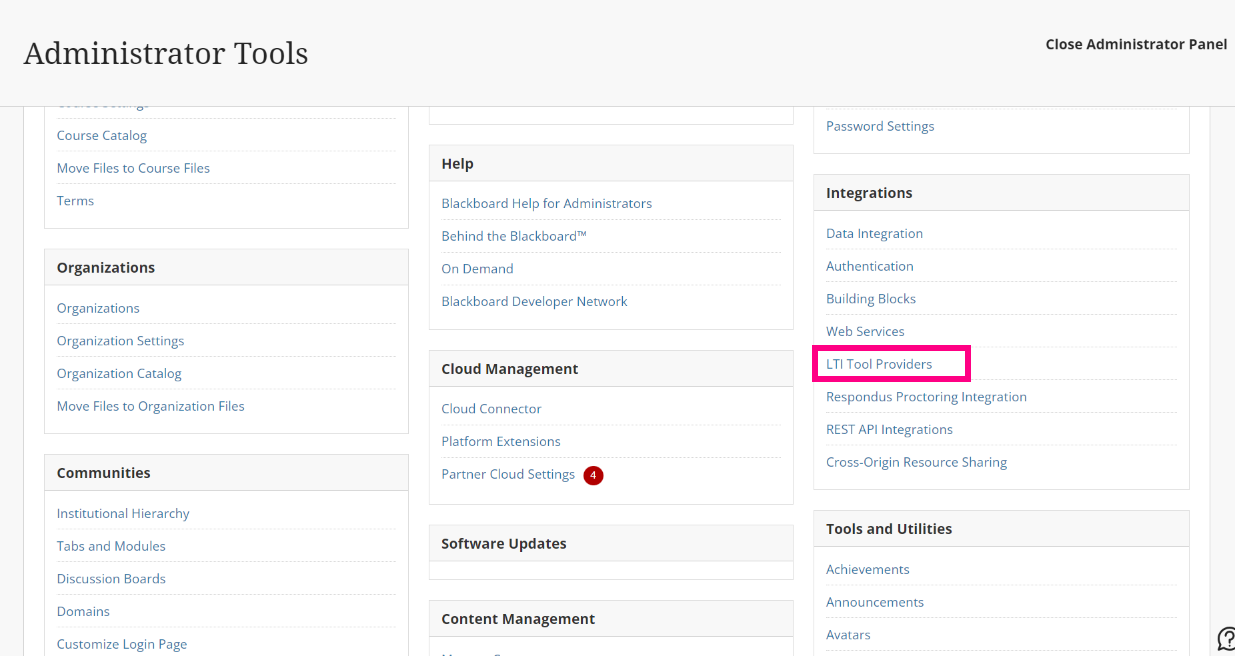
2. On the Administrator Tools page, in the Integrations section, click LTI Tool Providers.
This opens the LTI Tool Providers list.
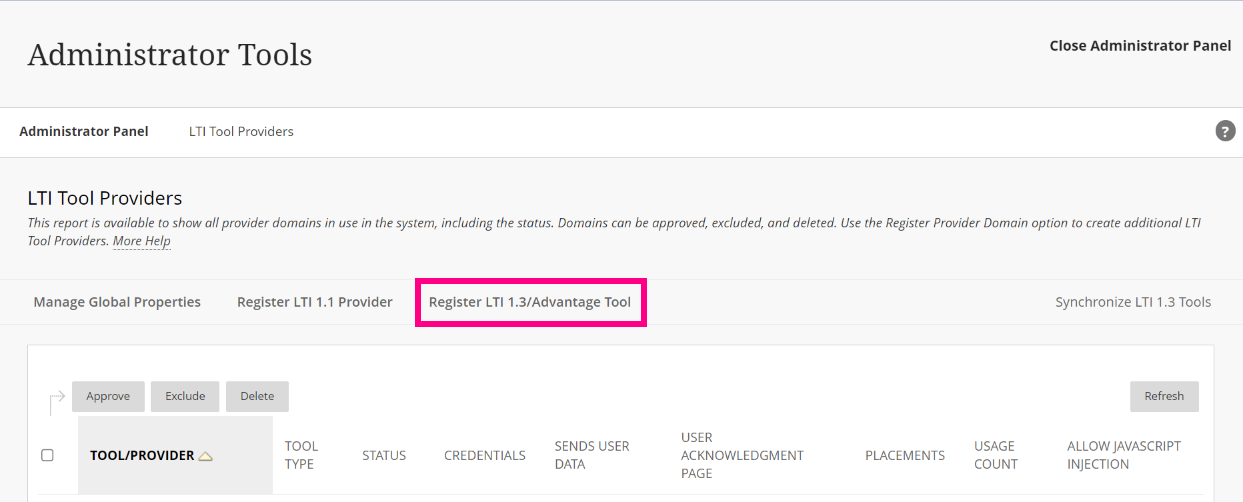
3. Click Register LTI 1.3/Advantage Tool.
4. For Client ID, enter 55b1fe0c-ceee-455e-b3eb-cd85d40e67e0 in the box and then click Submit.
To complete these steps, you must first log into Blackboard as an Administrator.
1. First, click Admin in the menu on the left.
2. On the Administrator Tools page, in the Integrations section, click LTI Tool Providers.
This opens the LTI Tool Providers list.
3. Click Register LTI 1.3/Advantage Tool.
4. For Client ID, enter 55b1fe0c-ceee-455e-b3eb-cd85d40e67e0 in the box and then click Submit.
 Warning: If you receive a notification from Blackboard about upgrading your existing LTI tool, it means you are currently using ScreenPal LTI v1.1. Stop here and follow the steps outlined in Upgrade to ScreenPal LTI version 1.3 for Blackboard.5. Once you enter the applicable Client ID, several fields are displayed and automatically filled with information. Verify the following:
- Tool Status is set to Approved.
- In the Institution Policies area, for User Fields to Send, all three options are selected (Role in Course, Name, and Email Address).
- Allow grade service access and Allow Membership Service Access are both set to Yes.
6. Before you proceed, please be sure to copy the value in the Deployment ID field and store it in a safe location for later use. 7. Click Submit.
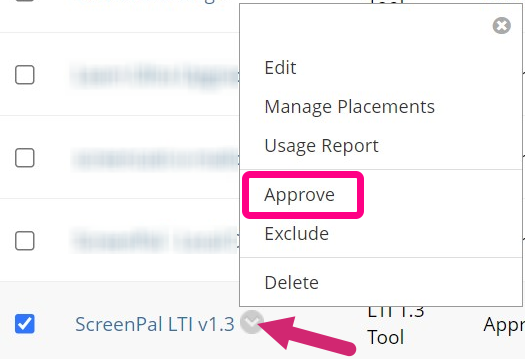
8. Back on the LTI Tool Providers page, click the arrow icon next to the ScreenPal LTI v1.3 tool you just created and select Approve.
Warning: If you receive a notification from Blackboard about upgrading your existing LTI tool, it means you are currently using ScreenPal LTI v1.1. Stop here and follow the steps outlined in Upgrade to ScreenPal LTI version 1.3 for Blackboard.
5. Once you enter the applicable Client ID, several fields are displayed and automatically filled with information. Verify the following:
- Tool Status is set to Approved.
- In the Institution Policies area, for User Fields to Send, all three options are selected (Role in Course, Name, and Email Address).
- Allow grade service access and Allow Membership Service Access are both set to Yes.
6. Before you proceed, please be sure to copy the value in the Deployment ID field and store it in a safe location for later use.
7. Click Submit.
8. Back on the LTI Tool Providers page, click the arrow icon next to the ScreenPal LTI v1.3 tool you just created and select Approve.
Team Admins: Connect the LTI 1.3 app in ScreenPal
1. Log into ScreenPal with your Team Admin or Team Owner account.
2. In the menu on the left, click Settings.
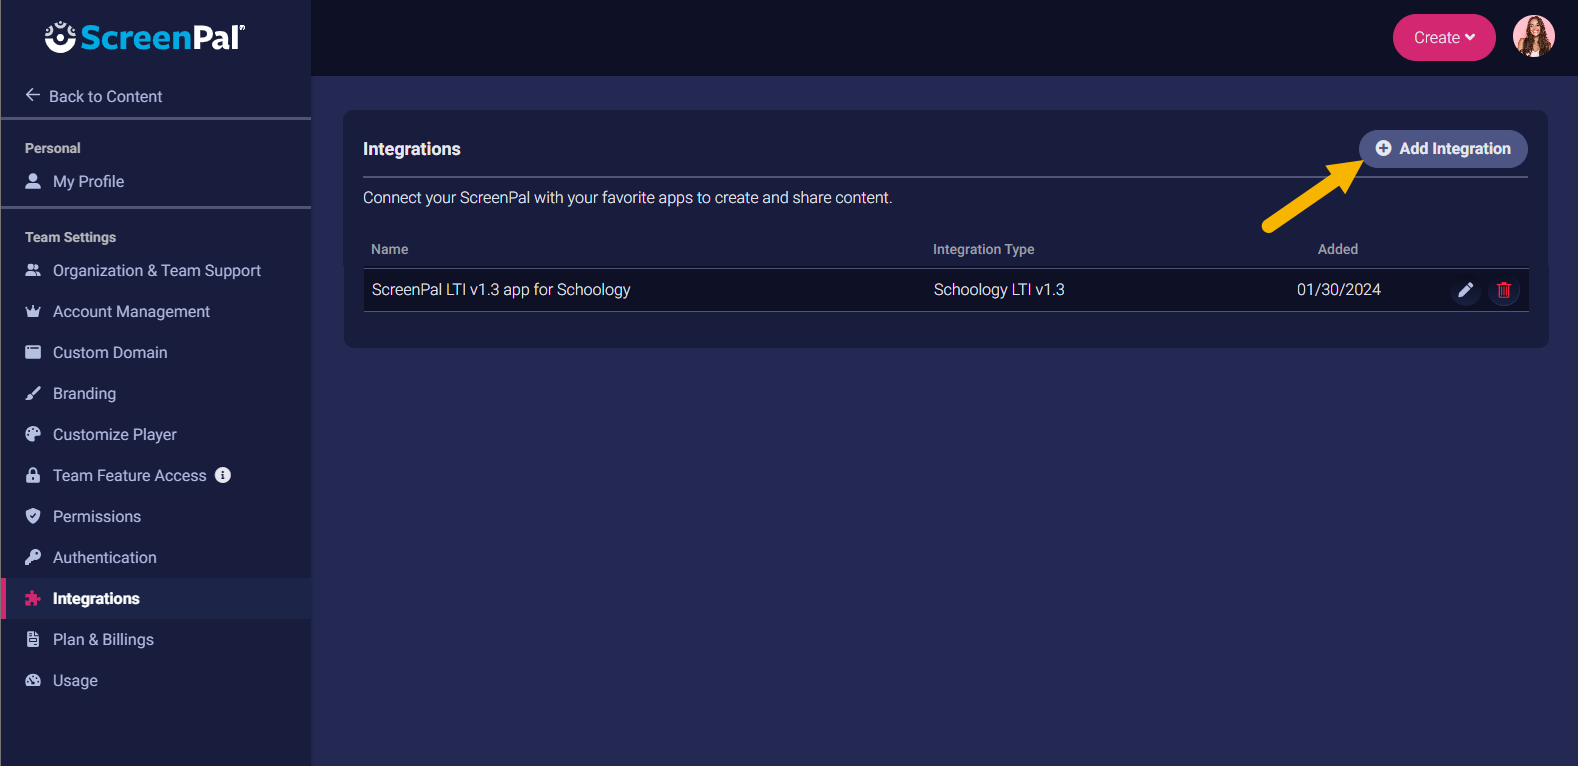
3. On the left sidebar, click Integrations.
4. Click the Add Integration button at the top of the page.
Additional fields are displayed.
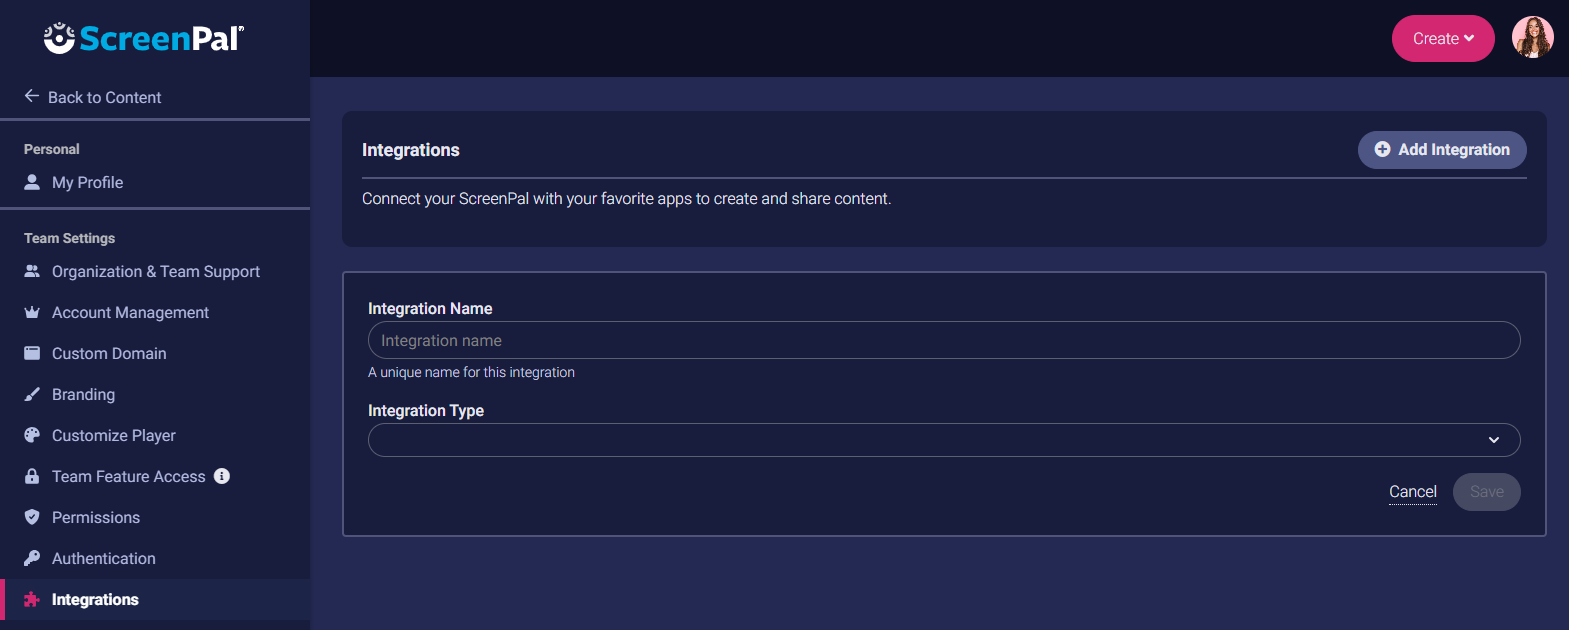
5. For Integration Name, enter a unique name for the integration you are adding. For example, ScreenPal LTI v1.3 for Blackboard.
Please note that since you can have multiple LMS integrations, the name for each one must be distinctive.
6. For Integration Type, select LTI v1.3 from the list. Additional controls are displayed.
7. For LMS Type, select Blackboard.
Several values, including the ones for Issuer, Auth/Access Token URL, Auth Login URL, and Key Set URL are automatically filled.
8. In the Deployment ID field, paste the Deployment ID you obtained from Blackboard in step 5 of the previous workflow.
9. For Client ID, enter the same Client ID you entered in Blackboard: 55b1fe0c-ceee-455e-b3eb-cd85d40e67e0.
10. Click Save.
1. Log into ScreenPal with your Team Admin or Team Owner account.
2. In the menu on the left, click Settings.
3. On the left sidebar, click Integrations.
4. Click the Add Integration button at the top of the page.
Additional fields are displayed.
5. For Integration Name, enter a unique name for the integration you are adding. For example, ScreenPal LTI v1.3 for Blackboard.
Please note that since you can have multiple LMS integrations, the name for each one must be distinctive.
6. For Integration Type, select LTI v1.3 from the list. Additional controls are displayed.
7. For LMS Type, select Blackboard.
Several values, including the ones for Issuer, Auth/Access Token URL, Auth Login URL, and Key Set URL are automatically filled.
8. In the Deployment ID field, paste the Deployment ID you obtained from Blackboard in step 5 of the previous workflow.
9. For Client ID, enter the same Client ID you entered in Blackboard: 55b1fe0c-ceee-455e-b3eb-cd85d40e67e0.
10. Click Save.
For information about how to add ScreenPal to a course in Blackboard, see our Add ScreenPal to a course in Blackboard article.