Set up ScreenPal with Canvas using LTI v1.3
Add the LTI v1.3 app as a Canvas admin
Our application integrates with many learning management systems via the Learning Tools Interoperability (LTI) standard. This article will help you with the setup and use of our LTI version 1.3 app with the Canvas LMS. For information about how to set up LTI version 1.1 with Canvas, see Set up ScreenPal with Canvas LMS using LTI version 1.1. If you are transitioning from an existing ScreenPal (or Screencast-O-Matic) LTI v1.1 integration, please see Upgrade to ScreenPal LTI version 1.3 for Canvas.
Please note that while we continue to support the use of LTI v1.1 with ScreenPal, we will no longer be developing ScreenPal feature updates for this version.
Use of the LTI app is only supported for Team Business and Team Education plans.
Create a Developer Key
First, Canvas requires you to create a Developer Key, which defines how and where ScreenPal can be accessed and what data it can access.
1. To begin, log into Canvas as an administrator.
2. On the left, click Admin, and select the name of your organization.
3. From the Admin menu, click Developer Keys.
4. Click the + Developer Key button in the top right and select LTI Key.
The Key Settings page is displayed:
5. Enter a Key Name. For example, ScreenPal LTI 1.3.
 Note: If you were previously using LTI version 1.1, be sure to give your Developer Keys unique names that will easily differentiate them from one another.
 6. For Owner Email, enter your email address.
7. You can leave the Redirect URIs field blank.
8. From the Method list, select Enter URL.
9. For JSON URL, enter https://screenpal.com/lti-1p3/config/canvas.json
10. Click Save in the bottom right corner.
Key Settings closes and you will see the Developer Key that you just created displayed in the list.
11. Verify that Canvas successfully loaded the configuration URL by clicking the Edit (pencil) icon next to the Developer Key you just created.
12. On the Key Settings page, make sure the Method field is set to Manual Entry. If it is blank, simply select Manual Entry from the list.
13. Confirm that the Redirect URIs field now contains the following value: https://screenpal.com/lti-1p3/launch
14. Close Key Settings by clicking Cancel.
15. Turn the key on, by switching the State toggle to the on position:
16. Next, copy the value in the Details column. This is your Client ID and will be needed later in the configuration process.
Admins: Add the ScreenPal LTI 1.3 app to Canvas
1. From the Admin menu, click Settings.
2. Click the Apps tab at the top of the page and then click the View App Configurations button.
3. Click the + App button in the top right.
This opens the Add App dialog:
4. For Configuration Type, select By Client ID.
5. For Client ID, enter the value you copied in step 15 above.
6. Click Submit.
You should now see the ScreenPal LTI 1.3 application in your installed apps list.
7. Click the gear icon on the right side of this row and select Deployment ID. This opens a dialog box that displays your Deployment ID for the ScreenPal LTI 1.3 app.
8. Copy the Deployment ID value and then click Close.
Configure the LTI 1.3 settings in ScreenPal
1. Log into ScreenPal as a Team Admin.
2. Click Settings in the menu on the lefet.
3. Within Settings, click Integrations.
4. On the Integrations page, click the Add Integration button in the top right corner.
5. For Integration Name, enter a unique name for the integration. In this case, you could enter ScreenPal LTI 1.3 for Canvas, for example.
6. For Integration Type, select LTI v1.3 from the drop-down list. This displays additional fields.
7. From the LMS Type list, select Canvas. This displays several additional fields.
8. For Deployment ID, enter the value that copied from step 8 in the Add the ScreenPal LTI 1.3 app to Canvas section above.
9. For Client ID, paste the value you copied in step 15 of the Create a Developer Key section (above).
With Canvas, the other fields (including Issuer, Auth/Access Token URL, Auth Login URL, and Key Set URL) are automatically filled with the correct values.
10. Click Save.
Admins: Enable resource links in copied courses
These steps are required to ensure resource links are kept intact when a course is copied. Afterward, instructors will be able to copy standard courses, copy Blueprint courses, or create new courses and import content from existing courses.
This task must be completed by a Canvas administrator, who has access to all courses.
1. Once logged into an admin account, go to Account > Settings.
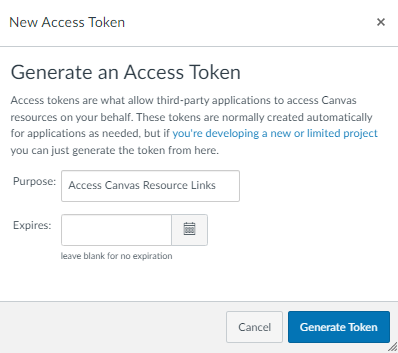
2. Under Approved Integrations, click the + New Access Token button.

3. On the New Access Token dialog, enter the purpose of the access token (for example, "Access Canvas resource links"), leave the Expires field blank if you do not want the token to expire, and click Generate Token.
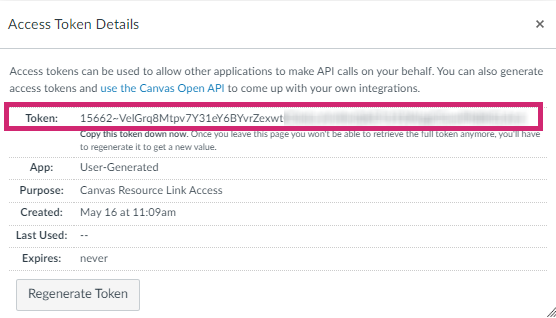
4. Access Token Details is displayed. Copy the token. After you leave the page, you will no longer be able to retrieve the full token.
5. Now, log into ScreenPal as a Team Owner or Team Administrator.
6. Go to Settings > Integrations and select your existing Canvas integration.
7. For API Access Token, enter the access token you just generated and copied from Canvas.
8. For LMS API URL enter https://<domain>.instructure.com/api/v1 where '<domain>' is the name of your school or institution from the institution-specific Canvas URL that you use to log into Canvas. (For example: https://canvas.instructure.com/api/v1.)
 Info: If you need to, you can find your school's Canvas URL by going to this page on the Canvas site.
9. Click Save.
That's it! You can now copy a Canvas course that contains resource links to ScreenPal content.
Note: After you copy a course to create a child course, before you edit assignment names in the child course, at least one user (this can be an Admin, Teacher, or Student), must visit those assignments within the new child course, open each assignment, and visit the ScreenPal content within it. After this action is completed, you can rename the Assignment as many times as you like without breaking the link to the original ScreenPal content.Related Articles
Set up ScreenPal with Canvas LMS using LTI version 1.1
ScreenPal integrates with many learning management systems via the Learning Tools Interoperability (LTI) standard. This article will help you with the setup and use of our LTI version 1.1 app within the Schoology LMS. For more information about how ...Upgrade to ScreenPal LTI version 1.3 for Canvas
If you were previously using Canvas with ScreenPal LTI version 1.1, follow the steps outlined in Set Up ScreenPal with the Canvas LMS using the LTI v1.3 app to upgrade to LTI version 1.3. This applies to you if you have an existing installation of ...Set up ScreenPal with Blackboard using LTI v1.3
How to set up ScreenPal with Blackboard using LTI v1.3 The ScreenPal LTI screen recorder integrates with many learning management systems. This article will help with the setup of the ScreenPal LTI version 1.3 app within the Blackboard LMS for ...Upgrade to ScreenPal LTI version 1.3 for D2L Brightspace
While D2L/Brightspace does support migration of some LTI version 1.1 integrations to LTI version 1.3, it will not successfully migrate external launch links for ScreenPal. ScreenPal LTI v1.1 links will continue to work and we recommend that you leave ...Set up ScreenPal in Schoology LMS using LTI v1.1
Our application integrates with many learning management systems via the Learning Tools Interoperability (LTI) standard. This article will help you with the setup and use of our LTI version 1.1 app within the Schoology LMS. For more information about ...