Set up ScreenPal in Schoology LMS using LTI v1.3
Our application integrates with many learning management systems via the Learning Tools Interoperability (LTI) standard. This article will help you with the setup and use of our LTI version 1.3 app within the Schoology LMS. For more information about how to set up LTI version 1.1, see this article.
Please note that while ScreenPal will continue to support the use of LTI v1.1 with ScreenPal, we will no longer be developing ScreenPal feature updates for this version.
Use of the LTI app is only supported for Team Business and Team Education plans.
Admins: Add ScreenPal LTI v1.3 to your instance of Schoology
1. Log into Schoology as an administrator.
2. Click this icon at the top of the page:
3. Click the App Center button.
4. Click My Developer Apps at the top of the page.
5. Click the Add App button.
6. Enter the following information (fields labeled with an asterisk are required):
- For App Name, enter ScreenPal LTI 1.3.
- For Description, enter anything you like.
- For Category, we recommend selecting Other.
- Next to Recommend For, select Instructors, Students, and Admins.
- In the Available for drop-down, select All Schoology users.
- For App Logo, you can use this image:

- For Type of App, select LTI 1.3 App from the list and then select the checkbox for Launch app in Schoology.
- For Can be installed for, select the checkboxes next to Course Materials Selection, Rich Text Editor, and External Tool.
- For LTI Advantage Extensions, select the checkboxes for Deep Linking, Assignment and Grade Services, and Names and Roles Services.
- For JWKS URL, enter https://screenpal.com/lti-1p3/jwks/schoology.
- For Domain/URL, enter https://screenpal.com/lti-1p3.
- For OIDC Login Init URL, enter https://screenpal.com/lti-1p3/login.
- For Redirect URLs, enter https://screenpal.com/lti-1p3/launch.
7. At the bottom of the page, select the checkbox next to This application meets the Schoology Terms of Use.
8. Click Submit.
9. In the Developer Apps list, click the Options drop-down list next to the ScreenPal LTI 1.3 app and select API Info.
10. Copy the Client ID and store it in a safe place for later input into ScreenPal.
11. Close the API Information dialog box.
Admins: Install the LTI v1.3 application
1. Click Install LTI 1.3 App button in the same row as the ScreenPal LTI 1.3 item.
2. On the Install App dialog, click I Agree.
3. The next dialog provides information about deep linking, assignment and grade services, and names and roles services. If you agree to authorize ScreenPal to use these LTI extensions, click Continue.
4. Click Add to Organization.
The App Center page for Organization Apps opens.
5. Next to the ScreenPal LTI 1.3 app, click the Configure button.
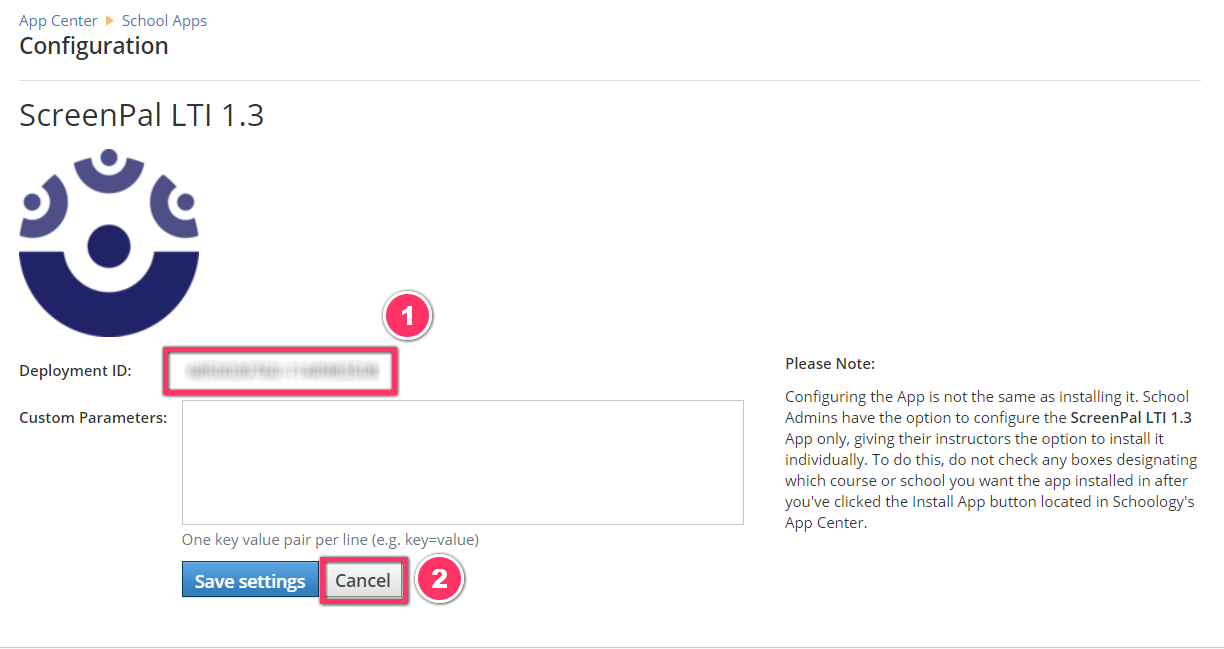
The Configuration page opens.
6. Copy the Deployment ID, save it for use within ScreenPal, and then click Cancel.
Admins: Connect the ScreenPal LTI v1.3 installation
1. Log into ScreenPal as a Team Admin.
2. From the navigation menu on the left, click Settings.
3. Within Settings, click Integrations.
4. Click the Add Integration button in the top right corner of the page.
5. For Integration Name, enter a unique name for the integration. In this case, you could enter ScreenPal LTI 1.3 for Schoology, for example.
6. For Integration Type, select LTI v1.3 from the drop-down list. This displays additional fields.
7. From the LMS Type list, select Schoology.
Several values, including the ones for Issuer, Auth/Access Token URL, Auth Login URL, and Key Set URL are automatically filled.
8. Enter your Deployment ID and Client ID, obtained in the previous workflows.
9. Click Save.
You're finished! You can now use the new ScreenPal LTI v1.3 integration within Schoology.
Teachers: Add ScreenPal content to a Schoology course
1. Log into Schoology and select an existing course or create a new one.
2. Under Course Options in the menu on the left, be sure Materials is selected and then click the Add Materials drop-down list.
If ScreenPal was added by an administrator, you will see it as an option to select:
4. If you do not see ScreenPal as an option, follow the steps below:
a. Click Add File/Link/External Tool.
b. Select External Tool.
c. On the Add External Tool dialog, for Tool Provider, select Automatic, based on URL.
d. For Title, enter the name of the tool as you want to see it in Schoology. For example, ScreenPal LTI v1.3.
e. For URL, enter https://screenpal.com/lti/xml.
f. You can ignore the Consumer Key, and Shared Secret fields.
g. Click Submit.
That's it! You should now be able see ScreenPal available in your list of materials and be able to add it to a course or assignment.
Related Articles
Add ScreenPal content to a Schoology course
Add ScreenPal content to a Schoology course Use the ScreenPal LTI app to insert ScreenPal videos, images, quizzes, and channels within your Schoology courses. You can also sync ScreenPal quiz scores with your Schoology Gradebook using the ScreenPal ...Set up ScreenPal with Canvas using LTI v1.3
Add the LTI v1.3 app as a Canvas admin Our application integrates with many learning management systems via the Learning Tools Interoperability (LTI) standard. This article will help you with the setup and use of our LTI version 1.3 app with the ...Set up ScreenPal in Schoology LMS using LTI v1.1
Our application integrates with many learning management systems via the Learning Tools Interoperability (LTI) standard. This article will help you with the setup and use of our LTI version 1.1 app within the Schoology LMS. For more information about ...Set up ScreenPal with Canvas LMS using LTI version 1.1
ScreenPal integrates with many learning management systems via the Learning Tools Interoperability (LTI) standard. This article will help you with the setup and use of our LTI version 1.1 app within the Schoology LMS. For more information about how ...Upgrade ScreenPal LTI to version 1.3 with Schoology
If you were previously using Schoology with ScreenPal LTI version 1.1, follow the steps below to delete this instance and then complete the installation instructions outlined in Set up ScreenPal in Schoology LMS using LTI v1.3 to upgrade to LTI ...