Set up ScreenPal LTI version 1.3 with D2L/Brightspace
The ScreenPal LTI plug-in integrates with many learning management systems, enabling you to insert ScreenPal content into a course. This article will help you with the setup of the ScreenPal LTI version 1.3 app within the D2L Brightspace LMS.
For information about how to set up version 1.1 of the ScreenPal LTI app, please see this article. However, please note that LTI 1.3 (or LTI Advantage) is now the only version of LTI supported by the IMS Global Learning Consortium.
Additionally, please note that while ScreenPal will continue to support the use of LTI v1.1 with ScreenPal, we will no longer be developing ScreenPal feature updates for this version.

Important: If you are currently using the ScreenPal LTI v1.1 tool, please read this Migration statement before upgrading to LTI v1.3.
Use of the LTI app is only supported for Team Business and Team Education plans.
Register LTI version 1.3 in D2L/Brightspace
1. Log into D2L Brightspace as an administrator.
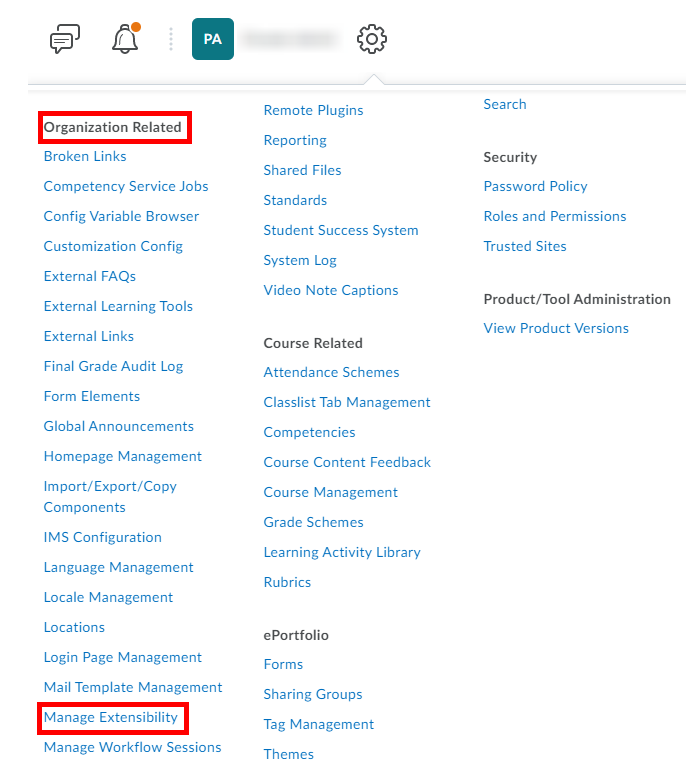
2. Click the Admin Tools icon ( ) in the top right. Under Organization Related, click the Manage Extensibility option.
1. Log into D2L Brightspace as an administrator.
2. Click the Admin Tools icon () in the top right. Under Organization Related, click the Manage Extensibility option.
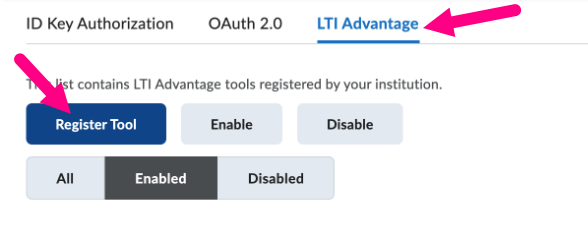
3. Click the LTI Advantage tab, then click Register Tool.
4. Under How would you like to register your tool, select Standard and then click Register.
This opens the Register a Tool page.
5. For Name, enter ScreenPal LTI v1.3 and enter a Description if you'd like.
6. For Domain, enter https://screenpal.com.
7. For Redirect URLs, enter https://screenpal.com/lti-1p3/launch.
8. For OpenID Connect Login URL, enter https://screenpal.com/lti-1p3/login.
9. In the Target Link URI field, enter https://screenpal.com/lti-1p3/launch.
10. For Keyset URL, enter https://screenpal.com/lti-1p3/jwks/d2l.
11. Under Extensions, select all three options: Assignment and Grade Services, Deep Linking, and Names
and Role Provisioning Services.
12. Click Register. Note: This displays a list of information that you will need when adding the D2L/Brightspace integration to ScreenPal.13. Copy and save the following information:
- Client ID
- Brightspace Keyset URL (Key Set URL)
- Brightspace Oauth2 Access Token URL (Auth / Access Token URL)
- OpenID Connect Authentication Endpoint (Auth Login URL)
- Issuer
14. Proceed to the Add a Deployment for the tool section below.
3. Click the LTI Advantage tab, then click Register Tool.
4. Under How would you like to register your tool, select Standard and then click Register.
This opens the Register a Tool page.
5. For Name, enter ScreenPal LTI v1.3 and enter a Description if you'd like.
6. For Domain, enter https://screenpal.com.
7. For Redirect URLs, enter https://screenpal.com/lti-1p3/launch.
8. For OpenID Connect Login URL, enter https://screenpal.com/lti-1p3/login.
9. In the Target Link URI field, enter https://screenpal.com/lti-1p3/launch.
10. For Keyset URL, enter https://screenpal.com/lti-1p3/jwks/d2l.
11. Under Extensions, select all three options: Assignment and Grade Services, Deep Linking, and Names
and Role Provisioning Services.
12. Click Register.
Note: This displays a list of information that you will need when adding the D2L/Brightspace integration to ScreenPal.13. Copy and save the following information:
- Client ID
- Brightspace Keyset URL (Key Set URL)
- Brightspace Oauth2 Access Token URL (Auth / Access Token URL)
- OpenID Connect Authentication Endpoint (Auth Login URL)
- Issuer
14. Proceed to the Add a Deployment for the tool section below.
Add a deployment for the tool
1. Click the Admin Tools icon () in the top right.
2. Under Organization Related, click External Learning Tools.
3. Ensure you are on the LTI Advantage tab, and then click New Deployment.
4. Verify that the Enabled control is in the On position.
5. Refer to the Upgrade to ScreenPal LTI version 1.3 for D2L/Brightspace article for information about migrating ScreenPal LTI v1.1 links using the Auto Migrate Links control.
6. In the Tool drop-down list, select the name you entered when registering the ScreenPal LTI 1.3 tool in step 5 of the previous section (for example, ScreenPal LTI v1.3).
7. Enter a Name for the deployment. This can be the same as the tool name (for example, ScreenPal LTI v1.3).
8. Enter a Description for the deployment.
9. Select all the checkboxes under Extensions: Assignment and Grade Services, Deep Linking, and Names and Role Provisioning Services.
10. Under Security Settings, select all of the checkboxes except Anonymous.
11. Select all of the checkboxes under Configuration Settings (Open as External Resource, Grades created by LTI will be included in Final Grade, and Auto Create Grade Items).
12. To support course copy functions, you must add a substitution parameter. To do this, click Add Substitution Parameter under Substitution Parameters:
13. For Name, enter parent_resource_link_id and for Value, select $ResourceLink.id.history.
14. Next, under Make tool available to, click the Add Org Units button
15. On the Add Org Units dialog, select the org units to make the ScreenPal LTI v1.3 tool available to, and then click Add.
16. Click Create Deployment.
17. Be sure to copy and save the Deployment ID that is displayed, for later entry into ScreenPal settings.
18. Click Done.
19. Click Save (not Save and Close) and proceed to the Add Links section below.
Add links
For all of the below link types, you will need to be on the External Learning Tools > LTI Advantage page with the ScreenPal LTI v1.3 deployment open. To access this page, click the Admin Tools icon in the top right of D2L/Brightspace, select External Learning Tools in the drop-down list, and then click the ScreenPal LTI v1.3 plug-in from the list on the External Learning Tools page.
This opens the Edit ScreenPal LTI v1.3 plug-in deployment page. Scroll to the bottom of this page and click View Links.
Create a Quicklink
This type of link will "remember" the ScreenPal content that is originally selected by the instructor during link placement, rather than launching the ScreenPal content selection box when a user clicks it.
1. On the Links page, click New Link.
2. For Name, enter Add ScreenPal Media.
3. For URL, enter https://screenpal.com/lti-1p3/launch.
4. Enter a Description if you like.
5. In the Type list, select Deep Linking Quicklink.
6. The Substitution Parameters should be parent_resource_link_id for Name, and $ResourceLink.id.history for Value.
7. Click Save and Close.
Create a basic launch link
1. On the Links page, click New Link.
2. Enter a Name for the link, such as ScreenPal LTI v1.3 - Basic Launch.
3. In the URL field, enter https://screenpal.com/lti-1p3/launch.
4. Enter a Description.
5. Click the Type list and select Basic Launch.
6. Click Save and Close.
Create deep links
1. On the Links page, click New Link.
2. Enter a Name for the link, such as ScreenPal LTI v1.3 - Deep Linking.
3. For URL, enter https://screenpal.com/lti-1p3/launch.
4. For Description, enter a brief description.
5. Click the Type drop-down list and select Deep Linking Insert Stuff.
6. Click Save and Close.
Connect your LTI 1.3 integration to your ScreenPal account
1. Log into ScreenPal with your Team Admin or Team Owner account.
2. From the navigation menu on the left, click Settings.
3. Within Settings, click Integrations.
4. Click the Add Integration button at the top of the page.
4. Click the Add Integration button at the top of the page.
This displays some additional controls.
5. For Integration Name, enter a unique name for the integration you are adding. For example, D2L LTI v1.3.
Note: Since you can have multiple integrations of the same type, the name for each one must be distinctive.6. For Integration Type, select LTI v1.3 from the list.
7. For LMS Type, select D2L/Brightspace.
8. In the Deployment ID field, paste the Deployment ID, obtained from the Brightspace LMS (step 14 of the Add a deployment for the tool workflow, above).
9. For Client ID, enter your Client ID, obtained from Brightspace (step 13 of the Register LTI version 1.3 in D2L/Brightspace workflow, above).
10. For the following, enter the values you obtained from Brightspace (step 13 of the Register LTI version 1.3 in D2L/Brightspace workflow, above).
- Issuer (URL, usually matches your D2L/Brightspace domain)
- Auth / Access Token URL (the D2L/Brightspace Oauth2 Access Token URL; URL that ends in /token)
- Auth Login URL (the Open ID Connect Authentication Endpoint from D2L/Brightspace; URL that ends in /authenticate).
- Key Set URL (the D2L Brightspace Keyset URL URL that ends in /jwks)
11. Click Save.
Related Articles
Upgrade to ScreenPal LTI version 1.3 for D2L Brightspace
While D2L/Brightspace does support migration of some LTI version 1.1 integrations to LTI version 1.3, it will not successfully migrate external launch links for ScreenPal. ScreenPal LTI v1.1 links will continue to work and we recommend that you leave ...Set up ScreenPal with D2L Brightspace using LTI version 1.1
Our application integrates with many learning management systems via the Learning Tools Interoperability (LTI) standard. This article will help with the setup and use of our LTI app version 1.1 with the D2L Brightspace for administrators and ...Set up ScreenPal with Canvas using LTI v1.3
Add the LTI v1.3 app as a Canvas admin Our application integrates with many learning management systems via the Learning Tools Interoperability (LTI) standard. This article will help you with the setup and use of our LTI version 1.3 app with the ...Set up ScreenPal LTI v1.1 with Moodle
How to set up ScreenPal LTI v1.1 with Moodle The ScreenPal LTI screen recorder integrates with many learning management systems. This article will help with the set up and use of our LTI v1.1 app within the Moodle LMS for administrators and teachers. ..."Unable to load the LTI app" message is displayed in my LMS when trying to open ScreenPal
When you log into your organization's learning management system (LMS) and attempt to launch the ScreenPal LTI plug-in, you may see the following message: This message is displayed when your assigned role in the LMS that is greater than that of a ...